Tagged: Kinect

Interactive Luminous Carpets with Kinect

carpetheader

The boundaries between the digital and physical world around us are fading. Traditionally passive objects like mirrors, windows, coffee tables, clothes and even plants are now becoming interactive. One of the innovations in this area is Luminous Carpets. It is a carpet with embedded LED lights. The product is a collaboration between Philips and Dutch carpet maker Desso.

Making it interactive

Although the carpet itself does not contain sensors to detect who is standing where, it is possible to add external sensors to detect the presence of people. I was invited by Luminous Carpets to setup an experiment to see if their demo floor could become interactive by adding a Kinect sensor. Here’s a video that shows some of the results of the singe day trial.

The Kinect was positioned at the front of the floor at a relatively large distance (> 3 meters) to be able to see all of the floor area. After setting up the equipment a calibration had to be applied for lining up the Kinect coordinate frame with the coordinate frame of the Luminous Carpet demo floor. The demo application was a WPF based application that generated a small grayscale image in the top left corner of the screen with a size of 112 x 56 pixels. The floor controller could then use this as a HDMI input for controlling the pixels of the luminous carpet.

By using Kinect in a frontal view body tracking can be used to build interactivity that understands joint positions. Individual joints can be projected to the floor taking into account their height above the floor. This can for instance be used to give the user a feeling that he is holding a lantern that lights up the floor. This positioning of the Kinect also implies looking into the direction of the sensor for best tracking results. For interaction with a floor however there is no direct directional preference for interaction other than suggested by the walls surrounding it.

Using the Kinect in a frontal setup may also cause that multiple users can occlude each other. Typically this is prevented by using a sensor that looks down from a large height and using blob detection and tracking for building the interactivity.

Natural surface interactions

Blending the digital and the real world can go beyond using hand-held devices like iPad or head-mounted devices like HoloLens. Any surface that surrounds us in our everyday lives can be made interactive by combining sensors and visual, tactile or auditive feedback. The surfaces that have the highest potential for natural interaction are those that we are already used to interact with on a daily basis. And if we don’t have to equip ourselves with wearables it can feel even more natural.

More

Build your own holographic studio with RoomAlive Toolkit

holoheader

With the current wave of new Augmented Reality devices like Microsoft HoloLens and Meta Glasses the demand for holographic content is rising. Capturing a holographic scene can be done with 3D depth cameras like Microsoft Kinect or the Intel RealSense. When combining multiple 3D cameras a subject can be captured from different sides. One challenge for achieving this is the calibration of  multiple 3D cameras so their recorded geometry can be aligned. In this article I will show you how I used RoomAlive Toolkit to calibrate two Kinects. The resulting calibration is used for rendering a live 3D scene. The source code for this application is available on GitHub.

Calibration with RoomAlive Toolkit

Calibration of multiple Kinects typically requires a manual process of recording a collection of calibration points. With RoomAlive Toolkit it is possible to automatically calibrate multiple projectors and Kinects. Since projectors are used to connect multiple Kinects during calibration a minimum of one projector is required. The only requirement is that the Kinects used can see a fair amount of the projected calibration images. When the calibration is done the projector is no longer needed.

Holographic studio setup

In the picture above you see the geometry and color image that was recorded by two Kinect V2’s. There’s an overlap in the middle. Two magenta frustums indicate where the Kinects were positioned and a purple frustum shows the position of the projector.  Note that both Kinects where placed in portrait mode for better coverage of the room. I placed a few extra items to help the solver algorithm in the RoomAlive Toolkit solve the calibration.

Collecting data from multiple Kinects

Since each Kinect V2 needs to be attached to a separate PC we need a way to collect the depth and color data on the main system. RoomAlive Toolkit also contains a networking solution for doing that. Each system runs a KinectServer WCF service that provides the raw Kinect color and depth data. All data is updated as it arrives without further attempt for synchronization. This results in some artifacts at the seams of the captured scenes.

Rendering live Kinect data

The simplest form of rendering is rendering the raw pieces of geometry of each Kinect. RoomAlive Toolkit contains a SharpDX based example that shows how to do this. It also shows how to filter the depth and how to apply lens distortion correction. Using this information I built a new application based on SharpDX Toolkit (XNA-like layer) to do the rendering. The application contains a few extras so you can tweak a few of the rendering parameters at runtime. I added a clipping cylinder so you can easily reduce the rendered geometry to a single person or object as seen in the video. And just for fun I added a shader to give the live 3D scene a more cliché holographic look. More info about the parameters and controls can be found on the Holographic Studio GitHub page.

Other demos of real time video capture

Holoportation by Microsoft Research
3D Video Capture with Three Kinects by Oliver Kreylos

More

Keep your magic a secret; hiding your Kinect V2

header

Like any good magician trying to keep it’s tricks a secret, developers of interactive installations should try to hide the technology of their installation as good as possible. This will keep your audience wondering and make your installation more magical. In this article I explore how the Kinect can be masked or hidden behind a Magic Mirror.

Masking the Kinect

A bulky device like Kinect V2 is hard to hide especially if it needs a proper view of your audience. Since the color and depth sensors in the Kinect V2 only cover part of the total front it makes sense to hide the rest of the device behind a thin wall. If you only use the depth camera for body tracking you can also cover the color camera and the microphone array. Since the front of the Kinect is covered with a flat piece of glass it requires some tweaking to find out where the sensors are exactly. I created a template PDF for masking the Kinect V2: KinectV2Masks

depthcolor

Color camera, IR camera and lights

depthonly
IR camera and lights if you only need body tracking or depth data

Note that you can also buy predesigned skins for Kinect for Xbox One online to let your Kinect blend into it’s environment better.

Hiding behind a Magic Mirror

With the rising popularity of magic mirror screens I also wondered if the Kinect could be hidden behind a two way mirror (aka Magic Mirror). If you place the Kinect tightly against the glass it is possible to look through the glass, but the quality of the depth image is worse than that of an unblocked Kinect. The quality of the image is highly dependent on the type of glass that is used. I tested this with a piece of acrylic and a few types of glass. Here are some screenshots from the Windows Store app Kinect Evolution

reference

Regular Kinect view without glass

glass1

Kinect behind two way mirror type 1, fairly good color image, reasonable depth image and body recognized

glass2

Kinect behind two way mirror type 2, little darker color image, depth worse than previous, but body still recognized

acrylic

Kinect behind acrylic mirror, dark color image, no depth, no body

So Kinect-wise the first glass mirror type that I tested performed best and the acrylic performed worst. But there is a trade-off in the quality of the mirror reflection as can be seen if you compare the pictures below.

glass1mirror

Reflection of the glass mirror type 1 as seen from the front

acrylicmirror

Reflection of the acrylic mirror as seen from the front

The mirroring effect is a careful balance between the reflectivity/transparency of the mirror, but also the amount of light in front of the mirror and the brightness of the screen behind the mirror. If you also want to hide a sensor behind the mirror the transparency must be good enough.

Conclusion

User interfaces are most natural if they do not reveal their technological components. In case of a Kinect based interactive installation hiding is not easily done. However there are a few tricks for minimizing the visibility of the used device. Which one is the most suitable depends on the specific needs of your installation. I am always interested to hear if you have other ways for hiding your Kinect.

More

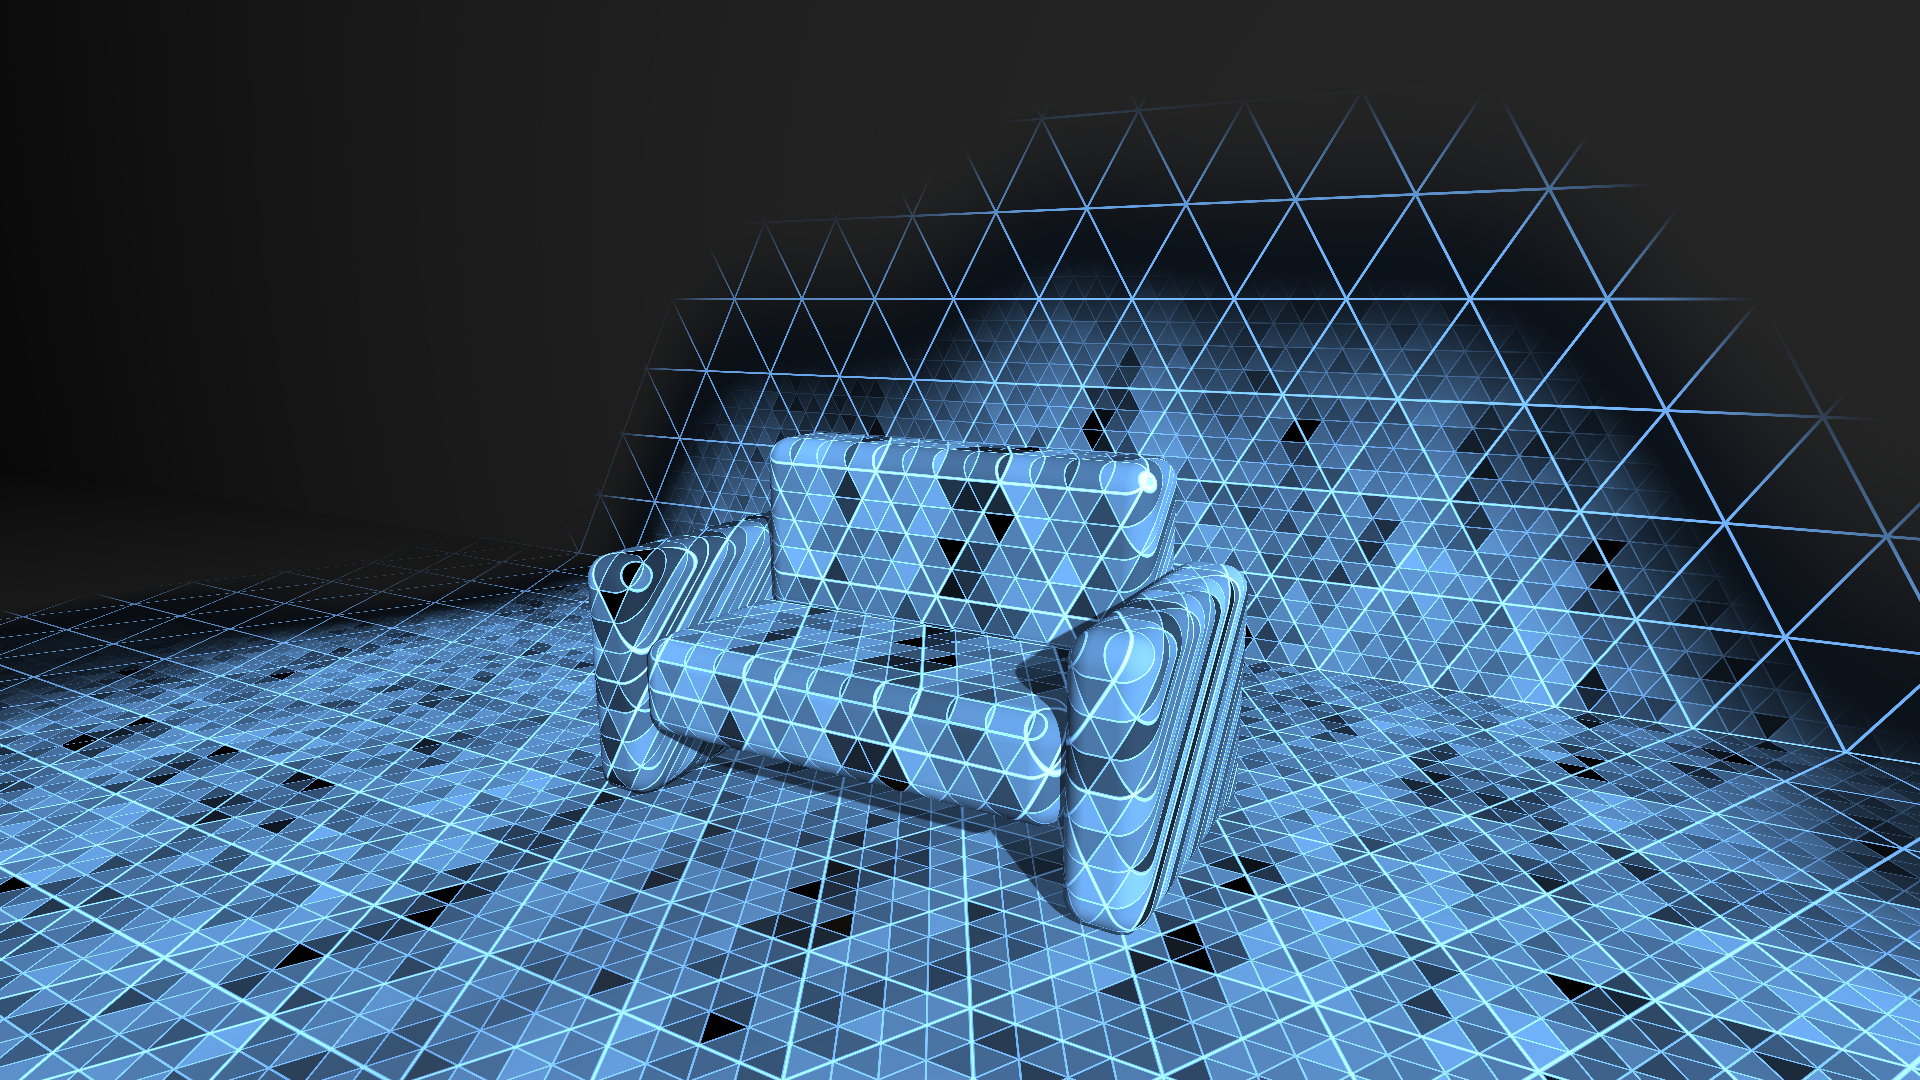
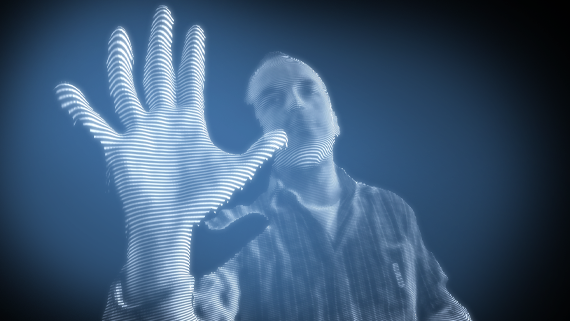
Rebuilding the HoloLens scanning effect with RoomAlive Toolkit

The initial video that explains the HoloLens to the world contains a small clip that visualizes how it can see the environment. It shows a pattern of large and smaller triangles that gradually overlay the real world objects seen in the video. I decided to try to rebuild this effect in real life by using a projection mapping setup that used a projector and a Kinect V2 sensor.

HoloLens room scan

Prototyping in Shadertoy

First I experimented with the idea by prototyping a pixel shader in Shadertoy. Shadertoy is an online tool that allows developers to prototype, experiment, test and share pixel shaders by using WebGL. I started with a raymarching example by Iñigo Quilez and setup a small scene with a floor, wall and a bench. The calculated 3D world coordinates could then be used for overlaying with a triangle effect. The raymarched geometry would later be replaced by geometry scanned with the Kinect V2. The screenshot below shows what the effect looks like. The source code of this shader can be found on the Shadertoy website.

Shadertoy Room Scanning Shader

Projection mapping with RoomAlive Toolkit

During Build 2015 Microsoft open sourced a library called the RoomAlive Toolkit that contains the mathematical building blocks for building RoomAlive-like experiences. The library contains tools to automatically calibrate multiple Kinects and projectors so they can all use the same coordinate system. This means that each projector can be used to project onto the correct location in a room. This can even be done on dynamic geometry. The toolkit also includes an example of reprojecting the recorded image with a pixel shader effect. I used this example to apply the earlier prototyped scan effect pixel shader onto a live scanned 3D geometry.

Source code on GitHub

Bring Your Own Beamer

The installation was shown at the Bring Your Own Beamer event held on September 25th 2015 in Utrecht, The Netherlands. For this event I made some small artistic adjustments. In the original video the scanning of the world seems to start from the location of the person wearing the HoloLens. In the installation shown at the event people were able to trigger the scanning effect with their feet. The effect starts at the triggered location and expands across the floor and up their legs and any other geometry in the room.


The distance from the camera determines the base color used for a particular scan. Multiple scans interfere with each other and generate a colorful experience. The video shows how part of the floor and part of the wall are mapped with a single vertically mounted projector. People seemed to particularly like to play with the latency of the projection onto their body by moving quickly.

More

Real life Portal; a holographic window using Kinect

The game Portal (released in 2007 by Valve) is known for it’s gameplay where portals could be used to teleport between different locations. Portals where rendered as virtual windows into the connected location with the well-known orange and blue rings around them. The game spawned a huge amount of memes, fan art and YouTube videos that used elements from the game.

Portal by Valve

Real life portals without trickery

The Kinect V2 is a sensor that can be used to record a 3D view of the world in real-time. It can also track users and can see what their body pose is. This can be used to perform head tracking and reconstruct a camera view into a 3D world as if looking through a virtual window. By using one Kinect for head tracking and another Kinect for reconstructing a 3D view, the virtual window effect of a portal can be created in reality. By using both Kinects for 3D world reconstruction and head tracking a two way portal effect can be achieved.

Hardware setup

In the setup used for recording the video two Kinects V2 were used. My laptop was connected to a projector that projected onto the wall. The PC displayed the other much smaller portal. Smaller portals hide more of the other side of the scene and allow for larger head movements. With a bigger portal you will run into the limitations in the field of view of the Kinect much earlier.

Instead of transferring the recorded 3D scene I swapped the Kinects and only transferred the recorded bodyframes through a network connection to mimimize latency. This limits the maximum range that the portals can be placed from each other. (about 7 meters when using USB3 extensions cables)

A portal opens as soon as a user is detected by the Kinect so proper head tracking can be done.  For the video I used the right hand joint for controlling the camera so the viewer would experience what it would look like when head tracking is applied.

Holographic window

Holography is quickly becoming the buzzword of 2015. It’s getting harder to keep a clear understanding of what holographic actually means. (and yes I’ve abused the term too) I like the view that Oliver Kreylos has on the term holography. (See: What is holographic, and what isn’t?)

Since both worlds are already rendered in 3D it is a small step to add stereo rendering. For instance with a Microsoft HoloLens. This brings us closer to a holographic window.
Here’s the checklist that Oliver Kreylos uses in his article:

  1. Perspective foreshortening: farther away objects appear smaller
    Check, due to perspective projection used in rendering
  2. Occlusion: nearer objects hide farther objects
    Check, due to 3D reconstructed world, but objects can occluded
  3. Binocular parallax / stereopsis: left and right eyes see different views of the same objects
    Check, when using a stereo display
  4. Monocular (motion) parallax: objects shift depending on how far away they are when head is moved
    Check, due to head tracking
  5. Convergence: eyes cross when focusing on close objects
    Check, when using a stereo display
  6. Accommodation: eyes’ lenses change focus depending on objects’ distances
    No

Natural user interface

Looking through a window is a familiar experience for almost everyone. Imagine being in a Skype conversation and having the ability to move your head to see who your caller is looking at or talking to (when it’s not you). A holographic window has the power to give people the feeling of being in the same space and allows for interesting new interactions. Anyone care for a game of portal tennis?

More

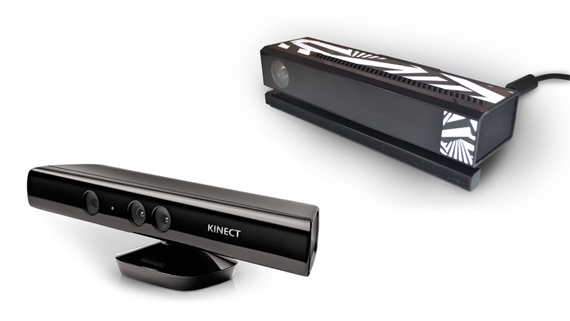
Kinect V1 and Kinect V2 fields of view compared

kinectsheader

With the impending release of the new Kinect for Windows this summer, I took a closer look at the differences in Field of View between the old and the new Kinect for Windows.
A well known improvement of the new Kinect for Windows sensor is the higher resolution of the image and depth streams. Part of the extra pixels are used to cover the extra viewing area due the increased horizontal and vertical fields of view of both the color and depth camera. The rest of the extra pixels contribute to a higher precision of what the cameras can see.

This article is based on preliminary software and/or hardware and APIs are preliminary and subject to change.

Color image

The old Kinect has a color image resolution of 640 x 480 pixels with a fov of 62 x 48.6 degrees resulting in an average of about 10 x 10 pixels per degree. (see source 1)

The new Kinect has color image resolution of 1920 x 1080 pixels and a fov of 84.1 x 53.8 resulting in an average of about 22 x 20 pixels per degree. (see source 2)

This improves the color image detail with a factor of two in horizontal and vertical direction. This is a welcome improvement for scenario’s that use the color image for taking pictures or videos, background removal (green screening), face recognition and more.

Depth image

The old Kinect has a depth image resolution of 320 x 240 pixels with a fov of 58.5 x 46.6 degrees resulting in an average of about 5 x 5 pixels per degree. (see source 1)

The new Kinect has a depth image resolution of 512 x 424 pixels with a fov of 70.6 x 60 degrees resulting in an average of about 7 x 7 pixels per degree. (see source 2)

This does not seem as a large improvement, but the depth images of the old and new Kinect can not be compared that easily. Due to the use of time-of-flight as the core mechanism for depth retrieval each pixel in the 512 x 424 depth image of the new Kinect contains a real measured depth value (z-coordinate) with a much higher precision than the depth image of the Kinect V1. The depth image of the old Kinect is based on the structured light technique. This results in an interpolated depth image that is based on a much lower number of samples than what the depth image resolution suggests.

Kinect field of view explorer

kinectfovexplorer

I built a tool based on WebGL / three.js to allow you to explore the differences between the old and new Kinect, their positioning and how this influences what can be seen. You can switch between the different Kinect sensor fields of view and it allows you to tweak the height and tilt of the sensor. It calculates the intersection with the floor and displays the width of the intersection and distance from the sensor.

The tool was tested to work with Mozilla Firefox 27 and Google Chrome 33 and Internet Explorer 11.

Open Kinect FOV explorer

Data sources

1 Mentioned values were retrieved from a Kinect V1 sensor with help of the Kinect V1 SDK. The KinectSensor object contains a ColorImageStream and DepthImageStream that both contain a FrameWidth and FrameHeight in pixels and the NominalHorizontalFieldOfView and NominalVerticalFieldOfView in degrees. The DepthImageStream also contains values for the MinDepth and MaxDepth in millimeters.

2 Mentioned values were retrieved from a Kinect V2 sensor with help of the Kinect V2 SDK. The KinectSensor object contains a ColorFrameSource and DepthFrameSource that both contain a FrameDescription containing the Width and Height in pixels and the HorizontalFieldOfView and VerticalFieldOfView in degrees. The DepthFrameSource also reports the DepthMinReliableDistance and DepthMaxReliableDistance in millimeters.


More

Live Kinect holography experiment

kinectheader

I had some fun together with my children and created a live holographic display.
Kinect holography uses a technique commonly known as Pepper’s Ghost. It was invented more than 150 years ago and is often used in theme parks or museums. A recent trend is to use it for product displays with animated special effects.

Kinect background removal

One of the things that can easily be done with the Kinect SDK is to extract a single person from the live image feed. I modified one of the samples in the Kinect SDK to show the background removed image fullscreen on a black background.

The PC is on top of a duplo structure with it’s display pointing down. The image is reflected in a 45 degree tilted glass plane.
The kids are wearing light colored clothes so they reflect better. I used an extra light that was on the floor in front of the kids.

The real magic happens if there is an object behind the glass plane that the person in front of the Kinect can sit in or stand on.

More